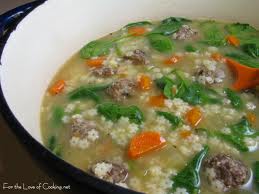
Italian Wedding Soup

Italian Wedding Soup

Italian Wedding Soup

This recipe for Italian Wedding Soup was given to me Ira Donewitz.  Ira woks with my husband and anytime he sees a recipe (cookies, desserts or this one) that he thinks I would like to have, he gives it to my husband.  This recipe came from Ira – I would like to thank him for it – and hope you all enjoy it.

Italian Wedding Soup Recipe

Italian Wedding Soup

1-  3 1/2 -4 lb. chicken

2 carrots, peeled and trimmed

2 rib celery

2 cups canned whole peeled plum tomatoes

Salt

½ cup acine de pepe (frog’s-eye) or other round pasta

1 bunch escarole, washed and coarsely chopped

½ lb. ground beef

1 egg yolk

2 Tbsp. dry bread crumbs

1 Tbsp. freshly grated parmigiano-reggiano

1 Tbsp. freshly grated romano

Leaves from 2 sprigs parsley, chopped

1 clove garlic, peeled and finely chopped

¼ tsp. dried oregano

Freshly ground black pepper

Put chicken, carrots, celery, tomatoes, 14 cups water, and salt to taste into a large pot.  Bring to a boil over high heat, skimming any foam that rises to the surface, then reduce heat to medium-low.  Simmer until chicken is just cooked through, about 40 minutes.

Meanwhile, cook pasta in a small pot of boiling salted water until just tender, 5-7 minutes.  Drain, rinse, and set aside.  Put escarole and 2 tablespoons water into a large skillet, cover, cook over medium heat until wilted, 4-5 minutes; and set aside.  Gently mix ground beef, egg yolk, bread crumbs, cheeses, parsley, garlic, oregano, ½ teaspoon salt, and ¼ teaspoon pepper together in a large bowl; form into ½” meatballs, then set aside.

Using a slotted spoon, transfer chicken to a large bowl and set aside to let cool.  Strain broth through a cheesecloth-lined colander into a clean medium pot, discarding solids.  Shred chicken meat and ser aside; discarding skin and bones.

Bring broth to a boil over high heat.  Add meatballs, reduce heat to medium, and simmer until cooked through; 10-15 minutes.  Add shredded chicken, escarole, and pasta, season to taste with salt and pepper.  Simmer for 15 minutes more.

(Recipe for Italian Wedding Soup was given by Ira Donewitz, from Saveur Reporter.)

Go onto my site: annettes-sweet-treats.com, and leave a message – it’s at the top of each recipe on the right side…it will tell you to leave a comment.  I would like to know your thoughts of the recipe.
PrintFriendlyShare

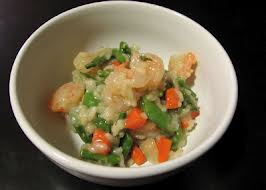
Shrimp and Spring Vegetable Risotto

Shrimp and Spring Vegetable Risotto

Shrimp and Spring Vegetable Risotto

We’ve pumped up the flavor by adding the shrimp shells and tails plus the vegetable trimmings to the simmering stock.  But if the time is tight, you may omit this step and still enjoy a deliciously light risotto.

Shrimp and Spring Vegetable Risotto Recipe

Shrimp and Spring Vegetable Risotto

8 oz. shell-on uncooked medium shrimp (31 to 35 count)

4 cups lower-sodium chicken broth

1 ¾ cups water

8 oz. asparagus

1 cup sugar snap peas

2 tsp. olive oil

1 medium onion, chopped

1 large carrot, diced

¾ cup Arborio rice *

1/3 cup dry white wine

1/3 cup grated Parmesan cheese

1 tsp. grated lemon peel

1 tsp. butter

Peel and devein shrimp, reserving shell and tails.  Bring broth and water to a simmer in large in large saucepan.  Meanwhile, snap off a tough ends of asparagus, reserving trimmings for flavoring broth.  Peel spears if desired; cut into ¾ inch pieces.  Pull off ends and strings from sugar snap peas, reserving trimmings for broth.  Cut in half diagonally.

Add shrimp shells and tails, end of asparagus and the pea trimmings to broth.  Simmer, partially covered, over-medium heat 20 minutes.  Strain into large saucepan, pressing on solids to extract maximum flavor; discard solids.  Bring to a simmer over medium heat.  Reduce heat to low; keep broth at a simmer.

Heat oil in large wide saucepan over medium heat until hot.  Cook onion and carrot 2 to 3 minutes or until softened but not browned, stirring occasionally.  Add rice; cook and stir 30 seconds.  Add wine;  cook and stir 30 seconds or until almost evaporated.  Add 1 cup of the hot broth; cook and stir until most of the liquid has been absorbed.  Continue adding broth ½ cup at a time, waiting until most of it has been absorbed before adding more, stirring occasionally.

Ten minutes before rice is done cooking, stir in asparagus and sugar snap peas.  Cook and stir 5 minutes, adding broth as needed.  Stir in shrimp; cook and stir 4 to 5 minutes or until shrimp turn pink, vegetables are tender and rice is tender with slight firmness to center, adding broth as needed.  (Risotto should have creamy, not soupy, texture.)  Remove from heat; stir in cheese, lemon peel and butter.

TIP:  *Arborio rice is an Italian short-grained rice.  The fat grains are very starchy and, therefore, perfect for making risotto because the excess starch helps create the creaminess necessary to this rice dish.

(Recipe for Shrimp and Spring Vegetable Risotto was in Cooking Club magazine, April/May 2011.)

PrintFriendlyShare

Ham and Corn Chowder

Ham and Corn Chowder

Ham and Corn Chowder

Recipe provided courtesy of Taste of Home magazine.  Find more great recipes at www.tasteofhome.com


My mother is an excellent cook who rarely follows a recipe exactly.  My two sisters and I do the same thing, adding something here, omitting something there.  With this soup, I something leave out the bacon and butter, and have used canned corn and creamed corn with good results.  We like to eat this soup with big soft hot pretzels instead of crackers.

Sharon Rose Brand                                                                         Stayton, Oregon


Ham and Corn Chowder Recipe

Ham and Corn Chowder

8 bacon strips, cut into 1 inch pieces

1 medium onion, finely chopped

1 cup sliced celery

½ cup diced green pepper

3 cups cubed peeled potatoes (about 3 medium)

3 cups chicken broth

4 cups whole milk, divided

4 cups fresh or frozen whole kernel corn, divided

2 cups cubed fully cooked ham

2 Tbsp. butter

3 Tbsp. minced fresh parsley

1 tsp. salt

1/8 tsp. pepper

1/8 tsp. hot pepper sauce, optional

In a large saucepan, cook bacon until crisp.  Remove bacon to paper towel to drain, reserving ¼ cup drippings in pan.  Sauté the onion, celery and green pepper in drippings for 5 minutes.  Add potatoes and broth.  Reduce heat; cover and simmer for 10 minutes.

Place ½ cup milk and 2 cups corn in blender; cover and process until pureed.  Pour into saucepan.  Add ham and remaining corn; simmer for 10 minutes or until vegetables are tender.  Stir in the butter, parsley, salt, pepper, pepper sauce if desired and remaining milk; heat through.  Garnish with bacon.

10-12 servings

(Recipe for Ham and Corn Chowder was on www.tasteofhome.com)

PrintFriendlyShare

Blueberry Streusel Muffins

Blueberry Streusel Muffins

Blueberry Streusel Muffins

Recipe provided courtesy of Taste of Home magazine.  Find more great recipes at www.tasteofhome.com

What a joy to set out a basket of these moist blueberry muffins topped with a super streusel on the brunch buffet.  People rave when they taste them for the first time.

Mary Anne McWhirter                                                                            Pearland, Texas

Blueberry Streusel Muffins Recipe

2

Blueberry Streusel Muffins

¼ cup butter, softened

1/3 cup sugar

1 egg

1 tsp. vanilla

2 1/3 cups flour

4 tsp. baking powder

½ tsp. salt

1 cup milk

1 ½ cup fresh or frozen blueberries

Streusel:    ½ cup sugar

1/3 cup flour

½ tsp. cinnamon

¼ cup cold butter

In a large bowl, cream butter and sugar.  Beat in egg and vanilla; mix well.  Combine the flour, baking powder and salt; add to creamed mixture alternately with milk.  Fold in blueberries.

Fill 12 greased or paper-lined muffin cups two-thirds full.  In a small bowl, combine the sugar, flour and cinnamon; cut in butter until crumbly.  Sprinkle over muffins.  Bake at 375 F. for 25-30 minutes or until browned.  Cool for 5 minutes before removing to a wire rack.  Serve warm.         1 dozen

Editor’s Note:  If using frozen blueberries, use without thawing to avoid discoloring the batter.

(Recipe for Blueberry Streusel Muffins was on www.tasteofhome.com)


Go onto my site: annettes-sweet-treats.com, and leave a message – it’s at the top of each recipe on the right side…it will tell you to leave a comment.  I would like to know your thoughts of the recipe.
PrintFriendlyShare

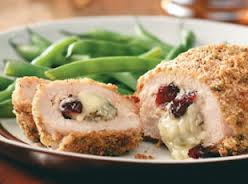
Cranberry-Gorgonzola Stuffed Chicken

Cranberry-Gorgonzola Stuffed Chicken

Cranberry-Gorgonzola Stuffed Chicken

Recipe provided courtesy of Taste of Home magazine.  Find more great recipes at www.tasteofhome.com


Chicken breasts go from ordinary to extraordinary when filled with filled with tart cranberries and creamy Gorgonzola.  Make it a meal with couscous and a green salad.

Kara Firstenberger                                                                       Cardiff, California

Cranberry-Gorgonzola Stuffed Chicken Recipe

Cranberry-Gorgonzola Stuffed Chicken

6 boneless skinless chicken breast halves (6 oz. each)

1 cup (4 oz.) crumbled Gorgonzola cheese

½ cup dried cranberries

2/3 cup chopped walnuts

1/3 cup packed fresh parsley sprigs

2/3 cup dry bread crumbs

½ tsp. salt

½ tsp. pepper

2 eggs

1 Tbsp. Dijon mustard

½ cup flour

Flatten chicken to ¼ inch thickness.  In a small bowl, combine cheese and cranberries.  Spoon ¼ cup cheese mixture down the center of each chicken breast.  Roll up and secure with toothpicks.

Place walnuts and parsley in a food processor, cover and process until ground.  Transfer to a shallow bowl; stir in the bread crumbs, salt and pepper.  In another shallow bowl, combine eggs and mustard.  Place flour in a third shallow bowl.  Coat chicken with flour, then dip in egg mixture and coat with walnut mixture.

Place seam side down in a greased 15×10 inch baking pan.  Bake at 350 F. for 35-40 minutes or until a thermometer reads 170 F.  Discard toothpicks.      6 servings

To Make Ahead:  Prepare the roll-ups; cover and refrigerate until ready to bake.

(Recipe for Cranberry-Gorgonzola Stuffed Chicken was on www.tasteofhome.com)


Go onto my site: annettes-sweet-treats.com, and leave a message – it’s at the top of each recipe on the right side…it will tell you to leave a comment.  I would like to know your thoughts of the recipe.

PrintFriendlyShare

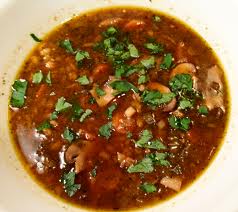
Beef-Barley-Mushroom Soup

Beef-Barley-Mushroom Soup

Beef-Barley-Mushroom Soup

I was looking through the Sunday Newsday (March 24, 2013), and I came across this recipe for Beef-Barley-Mushroom Soup.  If you’re like me – I’m always looking for recipes that are tasty.


Beef-Barley-Mushroom Soup Recipe

                Joe Falzone                                                                         Centereach, New York

Beef-Barley-Mushroom Soup

1 Lb. beef stew meat

2 Tbsp. flour

½ tsp. paprika

½ tsp. garlic powder

Salt, to taste

Black pepper, to taste

¼ cup canola or extra virgin olive oil

4 carrots

4 celery stalk, diced

1 medium onion, diced

3 garlic cloves, finely chopped

1 quart canned vegetable broth

2 cups low-sodium canned chicken broth

½ cup red wine

8 cups water

4 dashes Worcestershire sauce

1 cup pearl barley

6-8 oz. package sliced Portobello mushrooms

¼ cup finely chopped fresh parsley or 1 Tbsp. dried parsley; plus more for garnish

Combine first six ingredients in a small zipper-lock bag, shake until meat is coated and transfer meat to a plate.  Heat 2 tablespoons oil in a large saucepan over medium-high heat.  Add meat and brown on all sides, 6-8 minutes.  Transfer to a bowl.  Add 1 tablespoon oil, carrots, celery, onion and garlic to pan; cook until softened, about 8 minutes.

Add beef, broths, wine, 4 cups water and Worcestershire sauce to a pot and bring to a boil.  Lower heat, cover and simmer for 30 minutes.

Meanwhile, bring 4 cups water to boil in another pot.  Add barley, lower heat, cover and simmer 30 minutes.

In a small skillet, heat remaining 1 tablespoon oil over medium-high heat.   Add mushrooms and cook until tender.  Season with salt and pepper.

Add barley, mushrooms and ¼ cup fresh parsley to soup, cook uncovered until barley is tender, 15-20 minutes.  Adjust seasonings.  Pour into a large bowl, garnish with parsley.           4-5 servings


(Recipe for Beef-Barley-Mushroom Soup was in the Sunday Newsday, March 24, 2013, by Joe Falzone.)


Go onto my site: annettes-sweet-treats.com, and leave a message – it’s at the top of each recipe on the right side…it will tell you to leave a comment.  I would like to know your thoughts of the recipe.

PrintFriendlyShare

Vegetable Quiche Muffins

Vegetable Quiche Muffins

Vegetable Quiche Muffins

Rise and shine with the perfect breakfast bites!  Or, relax a little and serve them for a later brunch.  Either way, these little quiches are easy to make and even easier to make disappear.  Featuring a quick biscuit dough crust, they only require a few minutes of prep time.  Pair them with fresh fruit and assorted teas for a festive spring meal without the fuss.

Vegetable Quiche Muffins Recipe

Vegetable Quiche Muffins

1 10-count tube (7.5 oz. pkg.) standard size buttermilk biscuits

½ cup shredded reduces-fat Swiss, Cheddar or mozzarella cheese

1 cup broccoli florets

½ cup red bell pepper, thin strips

2 scallions, sliced

1 8-oz. carton refrigerated or frozen egg product, thawed (about 1 cup)

¼ cup evaporated skim milk

¼ tsp. dried thyme, crushed

1/8 tsp. black pepper

Additional thin strips red bell pepper, optional

Spray 12 count muffin tin with nonstick coating.  Carefully press 1 biscuit into each of 10 cups in muffin tin, flattening firmly with fingers to form the crust of the quiche.  Sprinkle evenly with cheese.

In a small covered saucepan, cook the broccoli, ½ cup bell pepper strips and the scallions in a small amount of boiling water about 3 minutes or until crisp-tender.  Drain well; sprinkle cooked vegetables over cheese in muffin tins.

In a medium mixing bowl, stir together egg products, evaporated skim milk, thyme and black pepper.  Pour over vegetables in muffin tins. (Note: You may have leftover egg mixture.  Do not OVERFILL or quiches will overflow.)   Place on a baking sheet.  Bake in a 375 F. oven for 25-30 minutes or until puffed and a knife inserted near the center of each comes out clean.  Let stand 5 minutes before serving.  If desired, garnish with additional strips of red pepper.

(Recipe for Vegetable Quiche was in Stop&Shop recipes that were mailed to card holders.)

Go onto my site: annettes-sweet-treats.com, and leave a message – it’s at the top of each recipe on the right side…it will tell you to leave a comment.  I would like to know your thoughts of the recipe.
PrintFriendlyShare

Rhubarb-Orange Muffins

Rhubarb-Orange Muffins

Rhubarb-Orange Muffins

These scrumptious muffins are perfect for breakfast in bed or a Mother’s Day brunch.   Sour cream gives them an extra-tender crumb.  Add ½ teaspoon grated fresh ginger or lemon peel for a flavor twist.  Mother’s Day is on Sunday May 12th.

Rhubarb-Orange Muffins Recipe

Rhubarb Orange Muffins

1 ¾ cups flour

2/3 cup sugar

1 tsp. baking powder

½ tsp. baking soda

¼ tsp. salt

1 (8 oz.) container sour cream, room temperature

3 Tbsp. orange juice

2 tsp. grated orange peel

2 eggs, lightly beaten, room temperature

5 Tbsp. unsalted butter, melted, cooled

1 cup diced fresh rhubarb (1/2 inch)

2 Tbsp. sparkling sugar

Heat oven to 400 F.  Line 12 muffin cups with paper liners or spray with cooking spray.  Whisk flour, sugar, baking powder & soda and salt in large bowl.

Whisk sour cream, orange juice and orange peel in medium bowl until blended.  Whisk in eggs until well-combined.   Whisk in butter.

Make well in center of flour mixture.  Pour in sour cream mixture; fold into flour mixture.  When about halfway combined, add rhubarb; fold just until no traces of flour remain.  Spoon into muffin cups; sprinkle with sparkling sugar.

Bake 18 to 20 minutes or until tops springs back when gently pressed and toothpick inserted in center comes out clean.  Remove from pan; cool completely.

(Recipe for Rhubarb-Orange Muffins was in Cooking Club magazine, April/May 2011)


Go onto my site: annettes-sweet-treats.com, and leave a message – it’s at the top of each recipe on the right side…it will tell you to leave a comment.  I would like to know your thoughts of the recipe.
PrintFriendlyShare